Pages

Friday, June 30, 2017

3,000 year old yarn

source
The ball of yarn shown at left is 3,000 years old. For much of its existence, it has been buried underground, in boggy land, along with the rest of the remains of three small houses built millennia ago, near what’s now Cambridge, England.

Ever since archaeologists discovered Must Farm, which has been called Britain’s Pompeii, they have been uncovering small clues as to what life was like for the families that lived here. This ball of yarn is one of the most delicate finds–extraordinary in its survival over all these years.

In the week since the yarn was first found (July 2016) the team has carefully cleaned it up. “Excavating and cleaning artifact this fragile is not easy but seeing them up close like this really shows how remarkable these finds are,” the team wrote on their Facebook page.

Thursday, June 29, 2017

What's the Difference?

source
Knitting Blog editor was curious the difference between yarns spun from hand carded rolags and blending board rolags. She knew that hand cards actually blend the fibers and a blending board mixes rather than thoroughly blends fiber, but she wanted to know what the yarns look like side by side.

See the results of her experiment here

Wednesday, June 28, 2017

Bobbin Winder

source

Knitty Blog shares Sweet Georgia's favorite bobbin winder is a drill and a chopstick. "I am the laziest spinner in all the land and using a cordless drill to wind storage bobbins hits my sweet spot. I usually use plastic weaving bobbins or cardboard storage bobbins (I love these because I can write on them). I use an inexpensive chopstick in my drill in place of a bit or a dowel. Since chopsticks increase in diameter the storage bobbins pressure fit on them, quick and easy."


Tuesday, June 27, 2017

Stop Silk from Snagging

source
Jackie E-S shares a tip to deal with rough, dry hands that can plague those who love to spin and knit with silk. She relates that even the barest little roughness can snag the silk fiber, making an otherwise pleasant experience into a irritatingly bad situation.

Her tip to remedy the snagging can be found here


Monday, June 26, 2017

Suminagashi Dyeing on Fabric - part 2

Sue O. adds dyes to the large tray of water
June 2017
Friday's post was about the experience of Suminagashi Dyeing, and today explains how the large panels of fabric were dyed.

once Sue O. had added all the ink that she wanted, the fabric was
carefully placed on top of the ink-covered water
Lorre H. assists Sue O. to makesure the fabric is straight and in the tray
allowing the fabric to take up the ink 
revealing the dyed panel
The panel was rinsed in plain water after it was removed from the tray.
Important Note: our instructor purchased cotton sheeting for the class and treated it with alum before the class so that it would take up the dye and so that the dye would adhere to the fabric. The fabric MUST be pre-treated.

the ink - purchased on Amazon

Friday, June 23, 2017

Suminagashi Dyeing on Fabric - part 1

Lorre H. demonstrates the technique of adding
ink to the tray of water
June 2017
Sue O. and Nancy S. took advantage of a Suminagashi class (also known as Japanese Marbling) last week at the Lander Art Center. It was a lot of fun and resulted in some interesting results.

adding layers of color on top of the water
The marbling ink is placed on top of the water in layers. The layers can carefully be manipulated to create swirls or pools of color.

ink floating on top of the water
fabric placed on top of the ink-covered water
dyed fabric after rinsing and pressing
The colors were quite vivid when they were wet, but once dried and pressed, they became muted.

Nancy's  collection of suminagashi dyed fabric squares
June 2017
Others in the class were more artistic with their squares.

rinsed dyed fabric squares 
completed squares
large panel of dyed fabric
Of all the fabric that was dyed that evening, this piece was by far a favorite. More photos on Monday . . .


Thursday, June 22, 2017

CroHooking - June Program

Sue O. explained the difference between Tunisian crochet and Crohooking
Many of the Guild members crochet, but few were aware of how to use a CroHook. At the June meeting, Sue O. presented a program on the process. It creates a fabric that is reversible, similar to Brioche knitting. The CroHook fabric is more flexible than Tunsian crochet.

starting a CroHook project
members gathered to learn more about how to CroHook

Some videos on the technique can be found here or here.

Sue said the hooks may be difficult to find - search for Cro Knit hooks, Double-ended crochet hooks, or Cro Hooks.


Wednesday, June 21, 2017

Show and Tell - June

Dawna H. brought a baby sweater, a WYO dishcloth and the beginning
of some Turkish Bedsocks to show to the members
Jeni V. received a skein of handspun baby camel and silk from Briana F.
She is also working on a Travelers Shawl
Colleen J. dyed a skein of yarn, discussed the upcoming Taos Wool Festival,
and expressed a concern about a new cowl she is knitting.
Sali a. is crocheting some scrap yarn into a rectangle. She modeled a tunic
she made from fabric samples that Christy P. gave her at the Togwotee Retreat
Maia R. finished the commissioned piano bench she made with
wool roving. Maia taught the technique at the Spring Retreat.
Sandy W. continues to spin using the rolags that she and Briana F.
created one weekend. The rolag contains multiple types of fiber
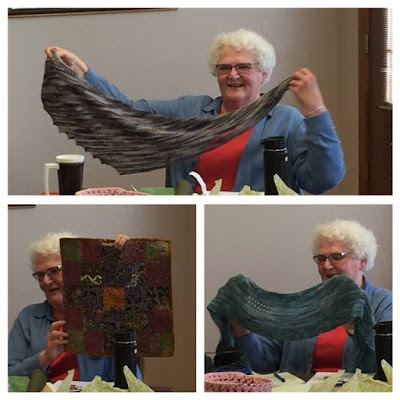
Nancy S. showed the group a cashmere hitchhiker shawl she knit and a batik
table mat made with fabrics reclaimed from a wrap around skirt. The teal shawl
used the free pattern 28's Cousin 53!
Jane P. joined the Guild on Saturday and knit on her mitered square
blanket during the meeting. 
Sue O. brought two infinity scarves. The top one was made with a
CroHook, and the bottom was crocheted with the yarn she dyed
with Kool-aid at the Spring Retreat.
Laura B. finished a pair of socks using leftover yarn. She also brought some
handspun yarn and a bag of luscious vicuna wool she purchased at the
Wool Market in Estes Park, CO for $26 an ounce.
Sam G. has been creating some "free-form" crochet medallions
She also wrote a pattern for a Jackalope and will knit some to sell
at the Lander Art Walk in July. 
Mary H. brought some new cork fabric that she purchased from Sew Da Kine
Mary makes tablet covers and other items with the cork fabric. Mary explained
she has learned to make bowls with straight sides. She jokingly showed the
bowl could also be a stylish hat. 


Tuesday, June 20, 2017

Colorado Wool Market

Colleen J.'s group booth at Colorado Wool Market
Laura B. shared photos taken at the Colorado Wool Market in Estes Park. 
Lynda G. and Polly H.'s booth
Jeny from Jeny Originals - Laramie, WY
Laura also took photos of a booth that she felt was exceptional:


Thank you, Laura for sharing your photos for this post. 


Monday, June 19, 2017

Sheep to Shawl Competition

Laura Brewer shared photos she took at the Wool Market Sheep to Shawl competition in Estes Park, Colorado. 

carding the wool for spinning preparation
carding wool before spinning
Laura wrote: For the Sheep to Shawl, there were 2 teams. Team #1 had a CVM fleece using plain and twill weaves for their pattern. That was the brown/cream shawl. Team #2 used a Jacob fleece, black and white, with a Swedish lace pattern.
team members spinning

Each team, of 5, with an alternate, scoured their fleeces prior to the contest. They were allowed to use that to card, spin and then warp their looms. On the day of the contest, they (all 5) picked, and carded
the fleece. Then one lady began spinning. When the carding was finished, the other 4 spun the rovings.
one person on each team was the designated weaver
weaving in progress for the purple team
 Then, one lady plied what was spun and gave it to the weaver. So, there were 4 spinners supplying the weaver.

weaving in progress
The contest was from 8:45 AM until 2:30 PM.
tying off the ends and finishing the shawl
finishing the shawl
 When the cloth was finished, they cut it off the loom, twisted the fringe on the ends, and then washed it in hot soapy water, rinsed, fixed any mistakes, then they were done.

washing the shawl 
Team #1 (wearing the green shirts) won the competition, by one point. The judging was open, so we got to watch as she gave her reasons.

Thank you, Laura for sharing your photos of the event.